
Hey Y’all! Yes, I just said y’all. For today’s post, I wanted to do another DIY project, but this time have it centered towards all the future Mrs., maid of honors, and really anyone who loves doing bridal projects like I do! So I have two projects for y’all to try!
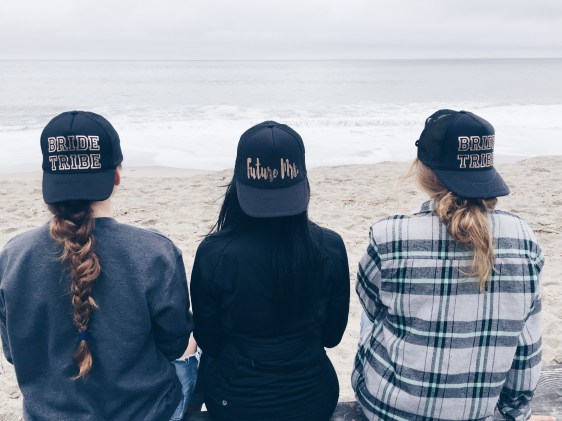
Project #1: Bridal Party Hats!
What You’ll Need:
- Blank Trucker Hats
- Cricut Explore Air (or any cricut)
- Iron-On Vinyl
- Iron
So this project is definitely on of my all time favorite. I started by creating hats to ask my bridesmaids along with a gift basket. I know that there is companies out there that I could have purchased from, but 1. the price was steep per hat and 2. I wanted my own design, not one that everyone has. So because I like to be original, and I have a Cricut, I decided it was time to get create. I ordered my blank hats from amazon for $3-$5. Not bad. And went down to Joannes and Micheal’s to look at the different vinyls I had to chose from. I went with a rose gold foil, and in my opinion is the cutest for bridal themed. I used my Cricut Design Space, to create the perfect lettering for my hat. I HIGHLY recommend investing in a Cricut machine. It has helped me with cards, iron-on creations, and that’s not even breaking the surface of what this machine is possible of doing! In total, I made 6 hat’s with the one roll of vinyl and still have extra left. So with each hat costing no more than $5, it only costed me about $8-$10 per hat! That saves me almost $20 if I were to purchase from another company or online store. With the amount of projects I have been able to do, my Cricut has pretty much repaid itself. I wanted to show off my favorite people with my favorite hats, so here you go!
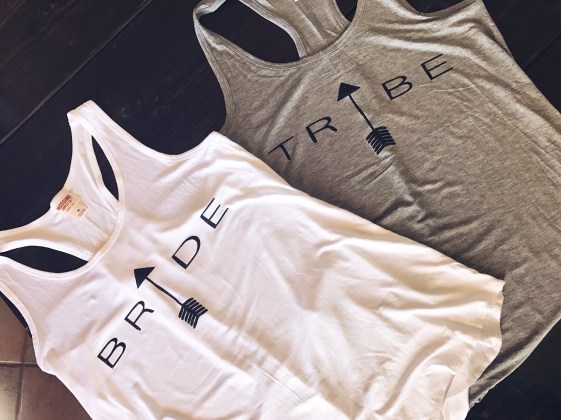
Project #2 : Bridal Party Tee’s!!
I don’t know about anyone else, but I am OBSESSED with everything bride. Like obsessed and I am pretty sure all of my instagram followers are probably tired of seeing me flaunt about being a bride or a future Mrs. But you know what, I am going to have fun with it. This is such a fun time in my life that I want to show it off, and I am going to be marrying an amazing man and I am proud to be his bride!So without further ado, let’s get to basics of this project!
What You’ll Need:
- Tank Top or Tee (I got all of mine from Target)
- Cricut
- Iron
- Iron On Vinyl
- Patience
I think the shirts and hats are actually tied. I love the shirts because there is so much more room to work with!! The designs can be bigger and flashier, and the possibilities are endless! So how I created all of my bridal shirts, I just went to target and got their blank essential tank tops, not the ribbed or cami style, the more flowy style. Once I knew what color tank I was working with, I decided to pick which color lettering I wanted. I have done a group order with gold glitter lettering and it turned out amazing in contrast to the white and black tanks. I have also done grey tanks with black glitter letters and loved them just as much! It is really based on preference. Pro Tip: when creating a design for a shirt, I like to the use the website canva.com. Canva allows you to create your designs and helps make sure all pieces of your design are centered with each other. It offers a ton of fonts and images that can be added into your design. Another cool thing about Canva is that it allows you to download your design WITH a transparent background. I have found this so helpful because once you upload your design onto the Cricut Design Space, its ready to be cut. All background filling is cleared out and honestly it is such a life saver because on one project I almost cut my whole design and had a huge spot that wasn’t cleared so it would’ve cut a big glob. So once I have my design finished on Canva, I download it and then upload it to my design space and let the cricut start cutting. Once it is cut and ready to be ironed, I make sure that my tank is centered as close to perfect as I can get it on my ironing board. I usually iron each one for about 5 to 10 minutes just to make sure everything is correct and won’t lift. And then BAM, you have a cute shirt!! I think making my own shirts, or making shirts for others, is so much fun! It is truly a hobby that I enjoy doing and I would love to do it for anyone!
If any of my readers needs a shirt or hat or anything else, message me through my contact tab and we can set something up!!
Thank you everyone for joining me on today’s post. I hope I’ve inspired you all to do some more fun little projects.

Leave a comment